
Recently I realized that after almost 10 years of writing about growing lithops and other succulents under less than ideal windowsill conditions I do not have a single post here that would summarize the whole endeavor. Let me try writing it all down now and if I miss something comments are always appreciated :)


Full disclosure. My approach is not scientific, I do not know the pH of the substrate nor do I note the average air temperature throughout the year. The experience I've gathered is based on close observation of the plants and learning from my mistakes.
1. The windowsill
There are some things you need to know about my windowsill:
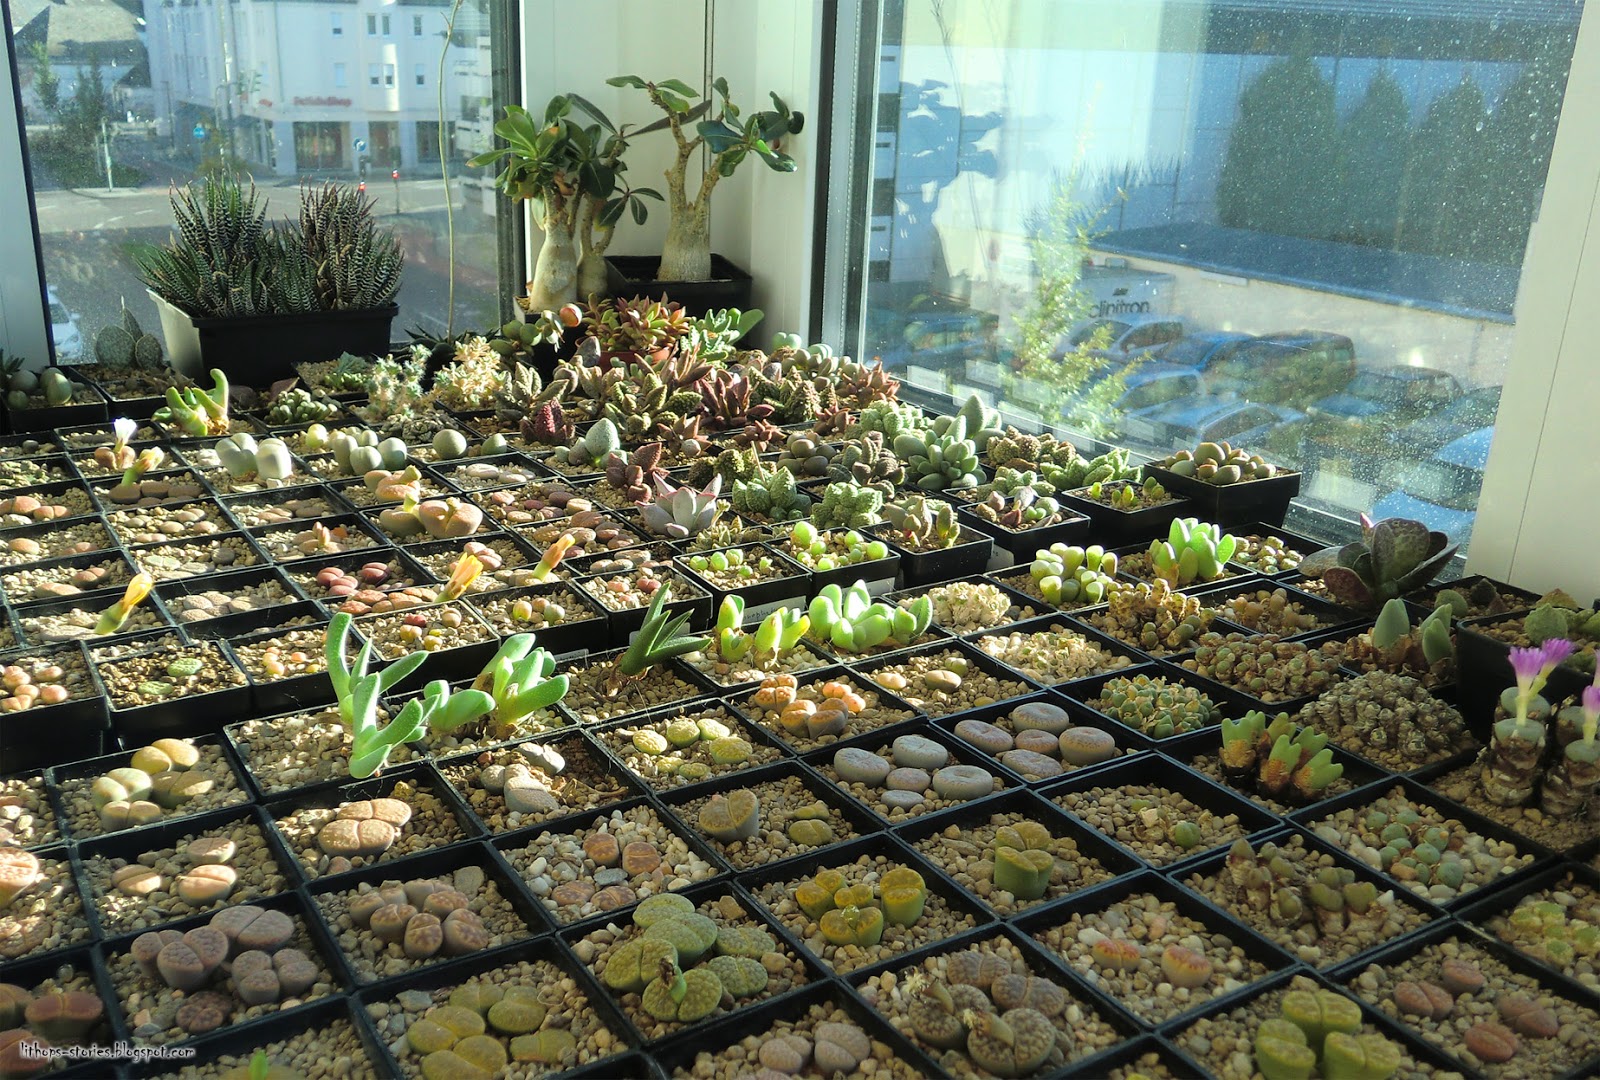
- It is quite spacious, measuring 0.6 x 2.5 meters. Currently I have 4 trays of plants there with several pots standing free. There is room for the 5th tray but I like to have some free space as I do my sowing and repotting (and my cat does her sleeping) there as well. The trays are 40x60cm and contain 77 containers each. I also use the spaces in between trays for shallower pots with younger seedlings and such.
- It has window panes on 3 sides, not just one, thus allows just a little bit more sunlight in during the day. The longest period of full sun exposure is between 6 am and 2 pm in Summer, which is not nearly enough. It's much much less than that in Winter (if the sun comes out at all). There are spots on the windowsill, behind the non-glass parts of the windows, that have more shade. I use those as well, in rotation, for example for sleeping conophytums or rooting adromischus leaves. No free spot stays unused.
- It is directed somewhat South-East, I believe. Meaning, when the sun rises it first appears straight and slightly to the left. Bear with me, I'm really not a scientist.
- I do not use any artificial light. The light the plants get solely depends on the weather.
- I do not use any fans, nor open the windows. The windowsill is in my living room, separated from it by Florentine tulle. Whatever air circulation happens naturally (probably caused by me running around) it seems to be enough.
- I do not manipulate the temperature in any way. In Winter it has about the temperature of my living room (I do not heat during the day when I'm at work). In Summer the temperature rises up to 48°C when the black pots get too hot to be touched. There was never any sunburn related damage on the plants that I can recall, probably because the sun moves on from the windowsill by 2 pm.

As you can see, the above describes the general conditions, constant value, on which I have no influence.
So what are the points that we actually can manipulate? What is it we can do to compensate for all the unforeseen weather-related hardships of our lithops and help them be their best selves?
Here comes the No 1 Rule for growing lithops on a windowsill: Keep your plants as small and flat to the ground as possible. Your goal is - by all means necessary - to prevent them from growing upwards, also known as stretching. The slower they grow and the smaller they stay the healthier and prettier they will be and the longer they will live. All the care you give them should have this as a goal. You can achieve it by controlling what substrate and pots the plants grow in and by restrained watering.
2. Substrate and containers
The substrate I use is pure pumice or pumice sand. There is absolutely no compost in there nor perlite or aquarium gravel. The size is often referred to as 0-2 mm but what it is is small pumice stones with pumice sand. Both Kakteen-Haage and Cono's Paradise sell it, if you're in Germany/EU, but it is also available on eBay or in stores specialized on bonsai. I tried Akadama, by the way, and it was a bad idea (the stuff they sell here is full of chemicals and slime). Do not use lava stones with holes in them for decoration either or you will never get rid of mealy bugs that hide in there. And if you use decorative quartz as top layer you will not be able to know whether your plant already has been watered recently or not and will keep watering it unnecessarily (believe me I know). In short, it's all pumice, all the way. Below is how slightly moist pumice looks like straight from the bag. I do not wash or microwave it. I only microwave the pumice I use for sowing (650 watts/1 kg/3 min).


You know how lithops like to rot? In pumice it rarely happens. The way it works so well is that the plants don't get "wet feet". Pumice does not retain moisture in a way compost does, making a swamp. Wet pumice, while sucking in water, does not let the roots actually be "in the water". The roots are semi-dry (no swamp) while the plant can still pull the moisture out of the stones when needed. This not only prevents rot but also is a safeguard against overwatering because it dries quicker. One wrong watering (that's often all it takes for your plants to start stretching) in pumice is less likely to be as dramatic as in other substrate. I refresh the substrate every 3 years or so.
It is also important that when you buy a plant that's already in a pot, you immediately pull it out, wash it, let it dry and transplant it into dry pumice where it will stay unwatered for at least a week. Even if you buy a plant from a specialized nursery and think that they use appropriate substrate and want to keep it - don't. What works in a greenhouse will not work on a windowsill. Any trace of plant food or compost will lead to stretching when there's not enough light to support the boost of growth (see No 1 Rule).
For adult lithops plants I use square plastic containers (with drain holes of course) that measure 5x5x8.5 cm. Anytime I tried something bigger I lost the plants to overwatering. You have no control in bigger pots. 5x5x5 cm pots would work very well, too. Lithops roots go deep though and the depth of 8.5 cm seems to be good for them. Kakteen Haage and Kakteen Schwarz (wholesale) in Germany offer them. The main thing is that the pots are small and you squeeze as many plants (of the same species and age/size) in one pot as possible without them touching each other. One-plant-per-pot approach is for greenhouses.

It is not only space-saving but also another overwatering safeguard. What one sleepy lithops cannot drink up, its neighbor will; what one greedy lithops could have consumed all by itself, it now has to share with others - no rotting roots and no stretching. Normally I have 4 one-headed plants in one pot or 2 two-headed. Below are 4 two-headed plants happily living in a 5cm pot. I can squeeze up to 16 seedlings into those 5 square centimeters - it only does them good.

It is not only space-saving but also another overwatering safeguard. What one sleepy lithops cannot drink up, its neighbor will; what one greedy lithops could have consumed all by itself, it now has to share with others - no rotting roots and no stretching. Normally I have 4 one-headed plants in one pot or 2 two-headed. Below are 4 two-headed plants happily living in a 5cm pot. I can squeeze up to 16 seedlings into those 5 square centimeters - it only does them good.
Also, use plastic, not clay. It dries quicker, is lighter and transplanting is much easier - just squeeze and pull. Thank me later.


3. Watering
This is the most tricky part. And the most important. You will have to summon all your power of observation and self-control to figure it out. Here are some pointers.
The first thing to remember is that once a year lithops need to change their leaves. The regeneration is a long process that takes several months to complete and during which old leaves completely dry up while the new leaves feed of them, recycling all the moisture. Unfortunately lithops are opportunistic and don't know what's good for them. If water keeps coming old leaves will never dry up and then stacking begins. At the end the new leaves choke on the old ones and the plant stretches, rots and dies. So much for the background.
Our task is now to support the regeneration. In northern hemisphere it means to stop watering completely mid- or late October. The last splash of water comes with a wilting flower. Once you stop watering the roots will become inactive and the old lithops leaves will get wrinklier and wrinklier. This is exactly what we want to see. Winter is a period of active growth, in fact - underneath, deep inside the plant, the new leaves are growing. The wrinklier the old leaves, the bigger the new ones. Around April the old leaves will be gone and the new fresh leaves will emerge. It can be earlier, it can be a bit later. This indicates that you can start watering again. If the old leaves are digested earlier it's better not to start watering until the weather stabilizes (many consequent sunny days). If the old leaves are not fully digested until June, cut off what's left of them and pretend they are. The roots will quickly re-grow and the plant will react to water after the second watering at the latest.


The second thing to remember is that between April and October you can not water by schedule. There is no schedule like "water all your lithops every two weeks". Now your power of observation comes into play. You look at every each of them, one by one, and decide which one gets watered and which one doesn't. Just looking is not enough, you also have to touch them. If they are wrinkly and soft (sometimes even hiding in the stones) - you may water. Otherwise you may not. When in doubt - don't water, re-evaluate in a week. Sometime during a Summer heatwave you might notice that the plants are wrinkly but hard as a stone. They are resting and no water is needed then. This is supposed to encourage flowering but who knows. Flowers on the windowsill are an exception, not a rule.
How much water do I give them? To illustrate, this is the watering can I use. For watering of one pot, no matter how many plants are in it, I use half of it.

I do not fertilize. Because I always forget. When I do remember, I do it in August or September. The beginning of the year feels too risky (stretching).
4. Sowing and seedlings
You guessed it, I use the same place and the same substrate for sowing. All my plants live together on the windowsill, including newly hatched seedlings. The difference is that I microwave the pumice before sowing and use 4x4x4 cm small pots (mainly because 20 of them neatly fit into my mini hatchery, formerly known as "jewelry box"). Bigger Ferrero Rocher boxes work well for sowing, too.

The method is simple: label the pots, fill them with pumice, make it wet, spread seeds on top, cover with a transparent lid and wait. No artificial light needed. You should sow either in February or in September though, when it's colder. In my experience germination starts one week later. Sometimes I get new seedlings after one month. Don't get discouraged. The "3 days" info you find online is fairly unrealistic. For the first few months the pumice surface should stay moist at all times. It does not mean you need to spray every hour. It stays moist automatically because the lid is on. Keep the seedlings under the lid until you feel they are strong enough to move out or be transplanted. Wait until the first true leaves to be on the safe side (about 4 months).

You will see a significant change in their surface structure after the first leaf change. It will be much firmer and stronger, it might already have some color that will keep them safe from strong sunlight. It's safe to remove the lid and let the pumice surface dry between waterings now. From there the care is basically: when you see them shrivel a bit, give them water, all through the year, even in winter. They are not on the yearly leaf changing schedule yet and will regenerate whenever they like, several times a year. It's how they grow.
The first thing to remember is that once a year lithops need to change their leaves. The regeneration is a long process that takes several months to complete and during which old leaves completely dry up while the new leaves feed of them, recycling all the moisture. Unfortunately lithops are opportunistic and don't know what's good for them. If water keeps coming old leaves will never dry up and then stacking begins. At the end the new leaves choke on the old ones and the plant stretches, rots and dies. So much for the background.
Our task is now to support the regeneration. In northern hemisphere it means to stop watering completely mid- or late October. The last splash of water comes with a wilting flower. Once you stop watering the roots will become inactive and the old lithops leaves will get wrinklier and wrinklier. This is exactly what we want to see. Winter is a period of active growth, in fact - underneath, deep inside the plant, the new leaves are growing. The wrinklier the old leaves, the bigger the new ones. Around April the old leaves will be gone and the new fresh leaves will emerge. It can be earlier, it can be a bit later. This indicates that you can start watering again. If the old leaves are digested earlier it's better not to start watering until the weather stabilizes (many consequent sunny days). If the old leaves are not fully digested until June, cut off what's left of them and pretend they are. The roots will quickly re-grow and the plant will react to water after the second watering at the latest.


The second thing to remember is that between April and October you can not water by schedule. There is no schedule like "water all your lithops every two weeks". Now your power of observation comes into play. You look at every each of them, one by one, and decide which one gets watered and which one doesn't. Just looking is not enough, you also have to touch them. If they are wrinkly and soft (sometimes even hiding in the stones) - you may water. Otherwise you may not. When in doubt - don't water, re-evaluate in a week. Sometime during a Summer heatwave you might notice that the plants are wrinkly but hard as a stone. They are resting and no water is needed then. This is supposed to encourage flowering but who knows. Flowers on the windowsill are an exception, not a rule.
How much water do I give them? To illustrate, this is the watering can I use. For watering of one pot, no matter how many plants are in it, I use half of it.

I do not fertilize. Because I always forget. When I do remember, I do it in August or September. The beginning of the year feels too risky (stretching).
4. Sowing and seedlings
You guessed it, I use the same place and the same substrate for sowing. All my plants live together on the windowsill, including newly hatched seedlings. The difference is that I microwave the pumice before sowing and use 4x4x4 cm small pots (mainly because 20 of them neatly fit into my mini hatchery, formerly known as "jewelry box"). Bigger Ferrero Rocher boxes work well for sowing, too.

The method is simple: label the pots, fill them with pumice, make it wet, spread seeds on top, cover with a transparent lid and wait. No artificial light needed. You should sow either in February or in September though, when it's colder. In my experience germination starts one week later. Sometimes I get new seedlings after one month. Don't get discouraged. The "3 days" info you find online is fairly unrealistic. For the first few months the pumice surface should stay moist at all times. It does not mean you need to spray every hour. It stays moist automatically because the lid is on. Keep the seedlings under the lid until you feel they are strong enough to move out or be transplanted. Wait until the first true leaves to be on the safe side (about 4 months).

This is how they will look like after 2 years. Yes, if they are at this size (4 mm?) you're doing it right. After two years they should be close to the yearly lithops life cycle and at the age of 4 they should start looking like adult plants. Do not believe the info online that they will flower when they are 3 years old. Can you imagine these tiny kids flowering? In a year they won't be much bigger.

Be patient. This year the seedlings I grew from seed 10 years ago are flowering for the very first time. And oh how rewarding this is!


Be patient. This year the seedlings I grew from seed 10 years ago are flowering for the very first time. And oh how rewarding this is!

This is the most practical description of lithops care I have ever found. I actually feel I might try another lithops now without it immediately turning into mush! Thank you.
ReplyDeleteThank you for visiting! :)
DeleteGood luck with your plants. It takes a bit of practice but you will figure them out eventually.
Great information! When do you transplant the babies into something grittier? Do they then go into a medium that an adult would be planted in, or is there something in between that and the sandier sowing medium?
ReplyDeleteThanks! :)
DeleteI use the same pure unwashed pumice (0-2mm) for seedlings and for adult plants. It's fairly small size. Too small won't let them root properly. If there is no pressing need to transplant them (like too much algae or bugs in the pot) I transplant them after first leaf change. But you can transplant them when you feel they are safe to grab. First couple of months they're kinda soft and watery but then they harden a bit. But really, if there's no need to repot you can keep them in the same pot for a long time.
Hi Rika, what stage would you stop watering the seedlings and follow the watering rules(no water in winter and mud summer)? After two years perhaps? Thanks
ReplyDeleteHi Mari, it depends on their size. When your seedlings are two years old, you will instinctively know if they are able to survive for several months without water. Mine are still way too small at 2 years, in general. Other people have lithops at a size of a mature plant at 2 years.
DeleteThank you. That is helpful and I understand it now. I will monitor the size of the seedlings and decide.
Deletewow
ReplyDeleteGreat information. Thank you for sharing. Do you know if I can buy those tall plastic containers on Amazon? Thanks.
ReplyDeleteSorry, I don't know. They are available form Kakteen Haage.
DeleteThanks a lot ! Great ! I feel more confident now and will follow your piece of advice.
ReplyDeleteello Ladina, moi aussi cet article m'aide beaucoup , c 'est parti pour pierre ponce uniquement, j ai 200 lithops recemment acquis! certains sont morts mais la plupart resistent! par contre je seme mais les bébés ne passent jamais le 2eme mois..je suis rassurée car apparement pour en avoir un qui atteint un an il faut compter 10 pertes! du coup maintenant je seme en gros 100 graines par pot! et j utilise la technique "Baggy" decrite par Uwe Beyer (proprio de cono'paradise et un des plus grands cultivateurs de lithops!) Belle aventure à toi !
Deleteyour experience will be very useful in the culture of lithops! thank you so much ! xxx
ReplyDeleteWonderful article, thank you! My seedlings are doing great at one month old. I've got about 18 different varieties growing. After a few weeks of sowing the algae set in, which is not affecting any of the existing seedlings. I had a couple late germinations that came in yellow and did not make it more than 1-2 weeks, I think due to the aglae. At this point most of the seeds have germinated, some varieties all have germinated. I'm wondering if I should scrape off the algae or let it go? I'm removing the lid from the tray for a few hours per day to help alleviate and prevent further algae growth. From what I read it will not harm the seedlings, but the late germinations it does seem to affect. Thanks for any help!
ReplyDeleteThank you for reading! :)
DeleteYes, the older stronger seedlings will manage. Also, when you start airing the pot or remove the lid completely the algae will disappear anyway. Hope your seedlings are doing fine :)
I STUMBLED UPON THIS BLOGSPOT and this is the MOST well written care instruction for lithops ever! thank you so much Rika sharing with us your 10 years worth of knowledge ��
ReplyDeletei recently sowed a few dozens of lithops seeds and half died unfortunately because of they became elongated and then tipped over (fell down) and rotted away ��. so now i have transplanted them and all okay now
however i have a question regarding sowing the very, very tiny seeds:
when you sow the seeds, is it okay if the seeds fall deep in the crevices between the pumice sand particles? i'm just scared the tiny, tiny seedling might not be able to reach the surface later on
Thank you for your most interesting and helpful post. I have been growing 17 Species of Mesembs in 100% Pumice for 3 months and so far am pleased with results. A friend who has used Pumice as his substrate for a long time has suggested that I feed my plants with Maxicrop seaweed fertiliser at 1/4 strength on a monthly basis during the growing seasons only as Pumice lacks certain certain items that for example organic John Innes would provide. While he has had success, how would you feel about feeding 1/4 strength? Thank you.
ReplyDeleteThank you for the most helpful article. I have moved from 1-3 mm pumice to 2-5mm which is fine for the larger Conophytum and Lithops but more difficult for the smaller rooted ones. What do you think about mixing the 1-3 mm pumice with the 2-5mm so that the smaller Mesembs get a better initial hold?
ReplyDeleteI started with 2-4 mm and that was fine for the larger Lithops. After a year the smaller ones were not going so well so I repotted with 50/50 1-3 & 2-4 mm Pumice and that did the trick.
DeleteThank you for your most interesting article. I have 40 Lithops and 100 Conophytum plus other Mesembs. I grew all of my collection in 100 % quality 1-3 mm and 2-4 mm Pumice for 3 years. The Lithops and Conos grew well in Pumice but sadly my Faucaria, Gibbaeum and Titanopsis didn’t like the substrate. I grow all mine in a South East facing glass roofed porch and on the windowsills.
ReplyDeleteThis comment has been removed by the author.
ReplyDelete